As a general rule, booting your Old World Mac from a CD is a simple matter. What is an “Old World Mac” you ask? Old World Macs are typically all Macs that preceded the beige G3 line. If your Mac is 68K based, it is an Old World Mac. If your PowerPC Mac has a numeric model number it is an Old World Mac. Starting with the beige G3s, Apple changed the onboard firmware to Open Firmware. Macs with Open Firmware are considered New World Macs. OK, now that we know what an Old World Mac is, let’s return to the topic of booting that Old World Mac from its CD drive. To do this you simply insert the CD and then restart your Mac while holding down the “c” key on the keyboard. The CD boots and all is well.
In theory, booting a Linux CD shouldn’t be that much different, but in practice it is. Old World Macs seem to lack the flexibility to boot non Apple media, for reasons I have not fully investigated. Hence, following the above prescription with a Linux CD won’t normally get you anywhere. With some frustration, you will watch Mac OS start to boot up, completely ignoring the CD that you wanted the Mac to actually boot from. This blog post is about how to overcome this annoying behavior and get a Linux CD up and running on your Old World Mac.
BTW, my efforts in this area have been focused on PowerPC based Macs. Although there are Linux installs available for 68K Macs, I tend to think that performance would be an issue on such lower power machines, and have not investigated this particular avenue. I have also been running Mac OS 9.x on the Macs I have been trying this with, and so cannot comment on whether the below works for earlier releases of Mac OS.
Honorable mention must be given to the good folks over at Linux MintPPC, who have actually delivered a truly bootable Linux CD. It is the only one I have found. Referring specifically to the following post in their forums (http://www.mintppc.org/forums/viewtopic.php?f=20&t=839), I downloaded the MintPPC_9_Nano ISO mentioned, burned it to CD, and tried the “c” approach to boot my Power Macintosh 7300. Much to my delight, it worked. No muss, no fuss – the Linux installer booted up and started to run. Now as we have seen in an earlier post, the installer died later on, but at least the CD booted! MintPPC was the only Linux distro I found (and I tried a lot!) that provided a truly bootable Linux CD (at least for my Power Macintosh 7300). Kudos to “lubod” for a job well done.
As I alluded to in my last post, the answer to booting an Old World PPC Mac from a Linux CD lies in a venerable and wholly unsupported piece of Mac OS software called BootX. BootX is a Mac OS application, so you have to boot Mac OS first, and then boot Linux next. BootX has a system extension that will intercept the boot process as Mac OS comes up and redirect it to a Linux boot, but for this post, we will stick to the simplest approach: boot Mac OS and then run BootX to boot Linux.
First things first. Despite its unsupported status these days, you can still get BootX from a variety of sources. One of them is the above mentioned MintPPC CD, which includes a full copy of BootX, greatly simplifying things for folks taking that route. For those of you who don’t want to go to the bother of downloading and burning a CD just to get a copy of BootX, you can also get it online (as of this writing) at http://penguinppc.org/wp-content/uploads/2011/01/BootX_1.2.2.sit. I got this link from an excellent page on the general topic at http://mac.linux.be/content/apple-oldworld-computers.
At the most abstract level, BootX is just a Mac OS application, so go ahead and install it. The documentation says to install it in the System Folder, but personally, I installed it at the root of my hard drive – I hate to put non-essential software into my System Folder. “Install”, in this case means to simply copy the BootX folder to the destination. That is all that is needed.
With BootX now installed, we must digress, ever so briefly, into the Linux boot process, so that you understand how to use BootX. I will make this as painless as possible – I promise! The world of Linux includes a variety of boot loaders, with weird and wonderful names like LiLo and GRUB and a few others to boot (pun intended!). All of these beasts get invoked from the host computer’s firmware when it starts up, and then go through a series of bootstrapping steps until the full bootloader itself is up and running.
The next major step in the Linux boot process (and this is where BootX will join that process) occurs when the bootloader invokes the Linux kernel (the core of the operating system) by loading it into RAM and passing control to it. Since nothing is yet known about the hardware configuration of the machine the kernel is running on, it is typically started with a RAM disk, so that it has an initial file system to work with until it can discover the location of the file system on the disk it is booting off of.
So, to really get Linux underway on your Old World Mac you need just three things: a Linux CD, a Linux kernel and an initial RAMdisk image. Happily, the kernel and the ramdisk image will be available on the CD you are trying to boot. Every Linux distribution provides these two items, since they are essential parts of the boot process. Hence, if you have a Linux CD you are interested in trying to boot, you are “good to go”. You will NORMALLY find the kernel and the ramdisk image in the /boot folder of the Linux CD you are trying to boot.
Conceptually, BootX’s operation is quite simple. Just point it at the appropriate Linux kernel and the associated ramdisk image and tell it to go. It loads both, passes control to the kernel, and Linux takes over your Mac. In reality, it really is almost that easy.
So, let’s try it! Find the Linux CD you want to boot. From a running copy of Mac OS, insert the CD and have a look at its contents. Find the /boot folder, or anything that has a Linux kernel and a ramdisk image, and copy those two files over to the Linux Kernels folder of the BootX folder you created when you installed BootX. A note of caution: some Linux distros support multiple architectures on the same CD. Debian is a good example of this. Make sure the kernel and ramdisk image you get are for the PowerPC architecture!
How will you recognize a Linux kernel and a ramdisk image? By general convention, Linux kernels are named something like “vmlinuz-2.6.8-ppc”, and the ramdisk image, properly referred to as an initial ram disk, or initrd, is usually named something very like “initrd-2.6.8-ppc.gz”. The important part of the above naming is the “vmlinuz” part and the “initrd” part. Find two files in the same folder with names like that, and you have found your kernel and your initial ramdisk image. Copy those over to your BootX installation and you are ready to go.
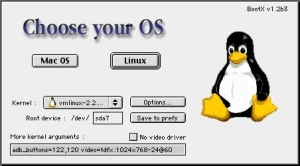
Running BootX is simplicity itself. Start it up, and you get the below GUI.
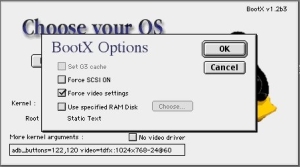
Point the Kernel drop down box to the kernel you have just copied over (it should be visible from the drop down box – anything in the Linux Kernels folder of the BootX install area shows up here). Click the Options button and you get this dialog:
Click the “Use specified RAM Disk” checkbox and use the Choose button to point to the initial RAM disk you copied over. Click the OK button to return to the main BootX dialog. For now, you can leave everything else blank. Simply click the Linux button and BootX will invoke the kernel you selected and you are off to Linux-land! Depending on your specific hardware and your degree of Linux savvy, you can start adding kernel arguments (stuff that is passed to the kernel as it is booted) and play with video driver settings too. All of that is beyond the scope of this particular post.
That’s it! You should be greeted with the usual Linux “text clatter” as it cranks through its start up process, and with any luck, everything may even work.
As we saw in my last post however, most of the Linux CDs out there don’t get along that well with older Macs, and so your mileage may vary. In my case, I can specifically recommend Ubuntu Breezy and MintPPC Linux 9, both of which fared reasonably well on my Power Macintosh 7300/200 with 256 MB of RAM.
I plan to install Linux on my Power Macintosh 7300/200 in the near future, but at present I am (im)patiently awaiting the arrival of a hard drive I ordered on eBay. When it arrives, I will add it to the machine, and install both Mac OS 9.1 and one of the above two Linux distributions. I will write a follow up post to fully document the Linux install process (vs. this post, which was simply about how to get the CD to even boot, so that you could get started!).
Until then, enjoy playing with Linux CDs on your Old World PowerMac!

